你好,我是孔令飞。
上一节课,我详细介绍了 Kubernetes 中 Leader Election 机制的原理,以及 kube-controller-manager 具体是如何通过 Leader Election 来实现多副本容灾的。
本节课,我将详细介绍如何在自己的项目中使用 Kubernetes 的 Leader Election 能力开发竞态资源处理组件,并结合实战示例与剖析源码,讲解基于 Lease 资源的 Leader Election 具体实现。
Leader Election 使用实战
Kubernetes client-go 项目仓库中,其实已经有一个优秀的 Leader Election 使用示例:examples/leader-election/main.go,示例代码如下:
/*
该示例来自于:https://github.com/kubernetes/client-go/blob/master/examples/leader-election/main.go
*/

package main

import (
    "context"
    "flag"
    "os"
    "os/signal"
    "syscall"
    "time"

    "github.com/google/uuid"
    metav1 "k8s.io/apimachinery/pkg/apis/meta/v1"
    clientset "k8s.io/client-go/kubernetes"
    "k8s.io/client-go/rest"
    "k8s.io/client-go/tools/clientcmd"
    "k8s.io/client-go/tools/leaderelection"
    "k8s.io/client-go/tools/leaderelection/resourcelock"
    "k8s.io/klog/v2"
)

func buildConfig(kubeconfig string) (*rest.Config, error) {
    // 如果指定了 kubeconfig,则使用指定的 kubeconfg 构建客户端
    if kubeconfig != "" {
        cfg, err := clientcmd.BuildConfigFromFlags("", kubeconfig)
        if err != nil {
            return nil, err
        }
        return cfg, nil
    }

    // 如果程序部署在 Kubernetes 集群内,则使用 In-Cluster Config
    cfg, err := rest.InClusterConfig()
    if err != nil {
        return nil, err
    }
    return cfg, nil
}

func main() {
    klog.InitFlags(nil)

    var kubeconfig string
    var leaseLockName string
    var leaseLockNamespace string
    var id string

    flag.StringVar(&kubeconfig, "kubeconfig", "", "absolute path to the kubeconfig file")
    flag.StringVar(&id, "id", uuid.New().String(), "the holder identity name")
    flag.StringVar(&leaseLockName, "lease-lock-name", "", "the lease lock resource name")
    flag.StringVar(&leaseLockNamespace, "lease-lock-namespace", "", "the lease lock resource namespace")
    flag.Parse()

    if leaseLockName == "" {
        klog.Fatal("unable to get lease lock resource name (missing lease-lock-name flag).")
    }
    if leaseLockNamespace == "" {
        klog.Fatal("unable to get lease lock resource namespace (missing lease-lock-namespace flag).")
    }

    // leader election uses the Kubernetes API by writing to a
    // lock object, which can be a LeaseLock object (preferred),
    // a ConfigMap, or an Endpoints (deprecated) object.
    // Conflicting writes are detected and each client handles those actions
    // independently.
    config, err := buildConfig(kubeconfig)
    if err != nil {
        klog.Fatal(err)
    }
    // 创建 Kubernetes 客户端实例,用来同 kube-apiserver 进行交互
    client := clientset.NewForConfigOrDie(config)

    // 执行程序的主业务逻辑
    run := func(ctx context.Context) {
        // complete your controller loop here
        klog.Info("Controller loop...")

        select {}
    }

    // use a Go context so we can tell the leaderelection code when we
    // want to step down
    ctx, cancel := context.WithCancel(context.Background())
    defer cancel()

    // listen for interrupts or the Linux SIGTERM signal and cancel
    // our context, which the leader election code will observe and
    // step down
    // 优雅关停实现
    ch := make(chan os.Signal, 1)
    signal.Notify(ch, os.Interrupt, syscall.SIGTERM)
    go func() {
        <-ch
        klog.Info("Received termination, signaling shutdown")
        cancel()
    }()

    // we use the Lease lock type since edits to Leases are less common
    // and fewer objects in the cluster watch "all Leases".
    // 指定锁的资源对象,这里使用了 Lease 资源,还支持 configmap,endpoint,或者 multilock(即多种配合使用)
    lock := &resourcelock.LeaseLock{
        LeaseMeta: metav1.ObjectMeta{
            Name:      leaseLockName,
            Namespace: leaseLockNamespace,
        },
        Client: client.CoordinationV1(),
        LockConfig: resourcelock.ResourceLockConfig{
            Identity: id,
        },
    }

    // start the leader election code loop
    // 开始 Leader Election 循环
    leaderelection.RunOrDie(ctx, leaderelection.LeaderElectionConfig{
        Lock: lock,
        // IMPORTANT: you MUST ensure that any code you have that
        // is protected by the lease must terminate **before**
        // you call cancel. Otherwise, you could have a background
        // loop still running and another process could
        // get elected before your background loop finished, violating
        // the stated goal of the lease.
        ReleaseOnCancel: true,
        LeaseDuration:   60 * time.Second, // Leader 持有租约的最大时间
        RenewDeadline:   15 * time.Second, // Leader 续租租约的超时时间
        RetryPeriod:     5 * time.Second,  // 候选节点重试时间
        Callbacks: leaderelection.LeaderCallbacks{
            OnStartedLeading: func(ctx context.Context) {
                // we're notified when we start - this is where you would
                // usually put your code
                // 变为 Leader 后需要执行的业务代码
                run(ctx)
            },
            OnStoppedLeading: func() {
                // we can do cleanup here
                // 打印日志,并退出进程
                klog.Infof("leader lost: %s", id)
                os.Exit(0)
            },
            OnNewLeader: func(identity string) {
                // we're notified when new leader elected
                // 当产生新的 Leader 后执行的业务逻辑
                if identity == id {
                    // I just got the lock
                    return
                }
                klog.Infof("new leader elected: %s", identity)
            },
        },
    })
}
上述示例通过以下 2 个包来实现 Leader Election 功能:
-
k8s.io/client-go/tools/leaderelection:leaderelection 包是 Leader Election 核心实现代码所在的包,leaderelection 包支持通过多种 Kubernetes 资源来实现资源锁。例如:ConfigMap、Endpoints、Lease。 -
k8s.io/client-go/tools/leaderelection/resourcelock:resourcelock 是具体的资源锁实现。
我们来解释一下这段示例。首先使用了 Go 标准库中的 flag 包初始化一些命令行选项,通过这些命令行选项配置 kubeconfig、候选节点的唯一 ID、资源锁所在的命名空间和资源锁的名字。
接着创建了 kube-apiserver 的客户端,用来通 kube-apiserver 进行交互。
然后通过以下代码实现了程序的优雅关停:
    ch := make(chan os.Signal, 1)
    signal.Notify(ch, os.Interrupt, syscall.SIGTERM)
    go func() {
        <-ch
        klog.Info("Received termination, signaling shutdown")
        cancel()
    }()
接着创建了一个 Lease 类型的资源锁,创建代码如下:
    lock := &resourcelock.LeaseLock{
        LeaseMeta: metav1.ObjectMeta{
            Name:      leaseLockName,
            Namespace: leaseLockNamespace,
        },
        Client: client.CoordinationV1(),
        LockConfig: resourcelock.ResourceLockConfig{
            Identity: id,
        },
    }
创建 Lease 锁实例的时候,我们指定了锁资源的命名空间和名字,还指定了实例的唯一 ID。client.CoordinationV1() 是版本化的 Lease 客户端,通过该客户端访问 kube-apiserver 进行 Lease 资源的 CURD 操作。
接着通过调用 leaderelection.RunOrDie() 函数运行程序。leaderelection.RunOrDie 是 Leader Election 的核心实现。leaderelection.LeaderElectionConfig 类型的配置中,我们配置了 OnStartedLeading、OnStoppedLeading、OnNewLeader 3 个 Hook。通过这 3 个 Hook,我们不难猜测出 leaderelection.RunOrDie 函数中,会在抢锁成功、抢锁失败、Leader 切换 3 个节点分别运行指定的函数。其中,在 OnStartedLeading Hook 中会执行我们期望的程序主逻辑(run 函数),也就是每次抢锁成功都会执行这些程序主逻辑。
打开 3 个 Linux 终端 A、B、C。在 A 中运行以下命令:
$ go run main.go -kubeconfig=/path/to/kubeconfig -logtostderr=true -lease-lock-name=example -lease-lock-namespace=default -id=1
I0921 20:36:39.598707  184529 leaderelection.go:250] attempting to acquire leader lease default/example...
I0921 20:36:39.617600  184529 leaderelection.go:260] successfully acquired lease default/example
I0921 20:36:39.617812  184529 main.go:87] Controller loop...
启动参数说明如下:
-
-kubeconfig:指定 kubeconfig 文件路径。 -
-logtostderr:设置日志输出的目标为标准错误(stderr)。 -
-lease-lock-name:指定了用于领导者选举的租约锁的名称。 -
-lease-lock-namespace:指定了租约锁所在的命名空间。 -
-id:指定当前实例的唯一标识符。
通过启动日志,可以发现 ID 为 1 的实例成功抢锁,并且执行了业务代码:
    run := func(ctx context.Context) {
        // complete your controller loop here
        klog.Info("Controller loop...")

        select {}
    }
也即往标准输出打印了一个 Info 级别的日志:I0921 20:39:41.236657 207526 main.go:87] Controller loop…。
在 B 中运行以下命令:
$ go run main.go -kubeconfig=/path/to/kubeconfig -logtostderr=true -lease-lock-name=example -lease-lock-namespace=default -id=2
I0921 20:39:41.944049  207565 leaderelection.go:250] attempting to acquire leader lease default/example...
I0921 20:39:41.956150  207565 main.go:151] new leader elected: 1
通过启动日志,可以发现 ID 为 2 的实例参与了 Leader 选举,选举出来的 Leader ID 为1。该实例因为不是 Leader,所以无法运行 run 函数,也就没有 Controller loop… 日志输出。
执行以下命令,可以查看锁资源的信息:
$ kubectl -n default get lease example -oyaml
apiVersion: coordination.k8s.io/v1
kind: Lease
metadata:
  creationTimestamp: "2024-09-21T12:36:39Z"
  name: example
  namespace: default
  resourceVersion: "232912420"
  uid: 0ad0cfd1-c5cb-4b82-b332-1fec942c8d28
spec:
  acquireTime: "2024-09-21T12:39:41.222004Z"
  holderIdentity: "1"
  leaseDurationSeconds: 60
  leaseTransitions: 5
  renewTime: "2024-09-21T12:42:11.469684Z"
通过 example Lease 资源的内容可以知道:当前的 Leader 是 ID 为 1 的实例。当前已经有过 5 次 Leader 选举,并且还能看到上次抢锁成功的时间、续约的时间。
现在,在 A 终端中键入 CTRL + C,终止掉 ID 为 1 的实例:
I0921 20:47:55.078334  207526 main.go:104] Received termination, signaling shutdown
I0921 20:47:55.082827  207526 main.go:142] leader lost: 1
切换到 B 终端,查看 ID 为 2 实例的日志:
I0921 20:47:55.597436  207565 leaderelection.go:260] successfully acquired lease default/example
I0921 20:47:55.597660  207565 main.go:87] Controller loop...
我们发现,ID 为 2 的实例成功抢锁,并运行了 run 函数,打印了日志。
接着查看 example Lease 的资源内容:
$ kubectl -n default get lease example -oyaml
apiVersion: coordination.k8s.io/v1
kind: Lease
metadata:
  creationTimestamp: "2024-09-21T12:36:39Z"
  name: example
  namespace: default
  resourceVersion: "233005011"
  uid: 0ad0cfd1-c5cb-4b82-b332-1fec942c8d28
spec:
  acquireTime: "2024-09-21T12:47:55.586494Z"
  holderIdentity: "2"
  leaseDurationSeconds: 60
  leaseTransitions: 6
  renewTime: "2024-09-21T12:50:00.862201Z"
通过 example Lease 的内容,我们可以知道刚才发生了 Leader 选举(leaseTransitions 数值增 1),并且当前的 Leader 变为 ID 为 2 的实例。
基于 Lease 的 Leader Election 源码剖析
上面,我通过一个简单的示例演示了如何使用 k8s.io/client-go/tools/leaderelection包,实现多实例的 Leader Election。接下来,我们再看下 Kubernetes 中 Leader Election 的具体实现方式。
Kubernetes Leader Election 机制是通过 k8s.io/client-go/tools/leaderelection 包来实现的。
这里,我们再回忆下 Leader Election 的实现原理,也是 leaderelection 包的实现原理, 简单概括就是:使用 configmap、endpoints 和 lease 资源实现一个分布式锁。抢(acquire)到锁的节点成为 leader,并且定期更新(renew)。其他进程也在不断尝试进行抢占,抢占不到则继续等待下次循环。当 leader 节点挂掉之后,租约到期,其他节点就成为新的 leader。锁相关的信息,保存在 configmap、endpoints、lease 资源中。
接下来,我们就看下 leaderelection 具体是如何按照上述思路实现 Leader Election 的。
Kubernetes Leader Election 实现源码概述
先来看下 leaderelection 包的源码结构:
$ tree -F client-go/tools/leaderelection/
client-go/tools/leaderelection/
├── healthzadaptor.go
├── leaderelection.go # 领导选举的核心实现,包含选举逻辑的主要代码
├── leasecandidate.go
├── metrics.go # 该文件实现了与领导选举相关的指标收集功能
└── resourcelock/ # 该子目录包含与资源锁定相关的实现,资源锁定是领导选举的基础
    ├── interface.go # 该文件定义了资源锁定的接口,允许用户实现不同的锁定机制
    ├── leaselock.go # 该文件实现了基于租约(Lease)的锁定机制
    └── multilock.go # 多锁实现
leaderelection.go 文件实现了 Leader Election 的核心逻辑,整个实现原理图如下:
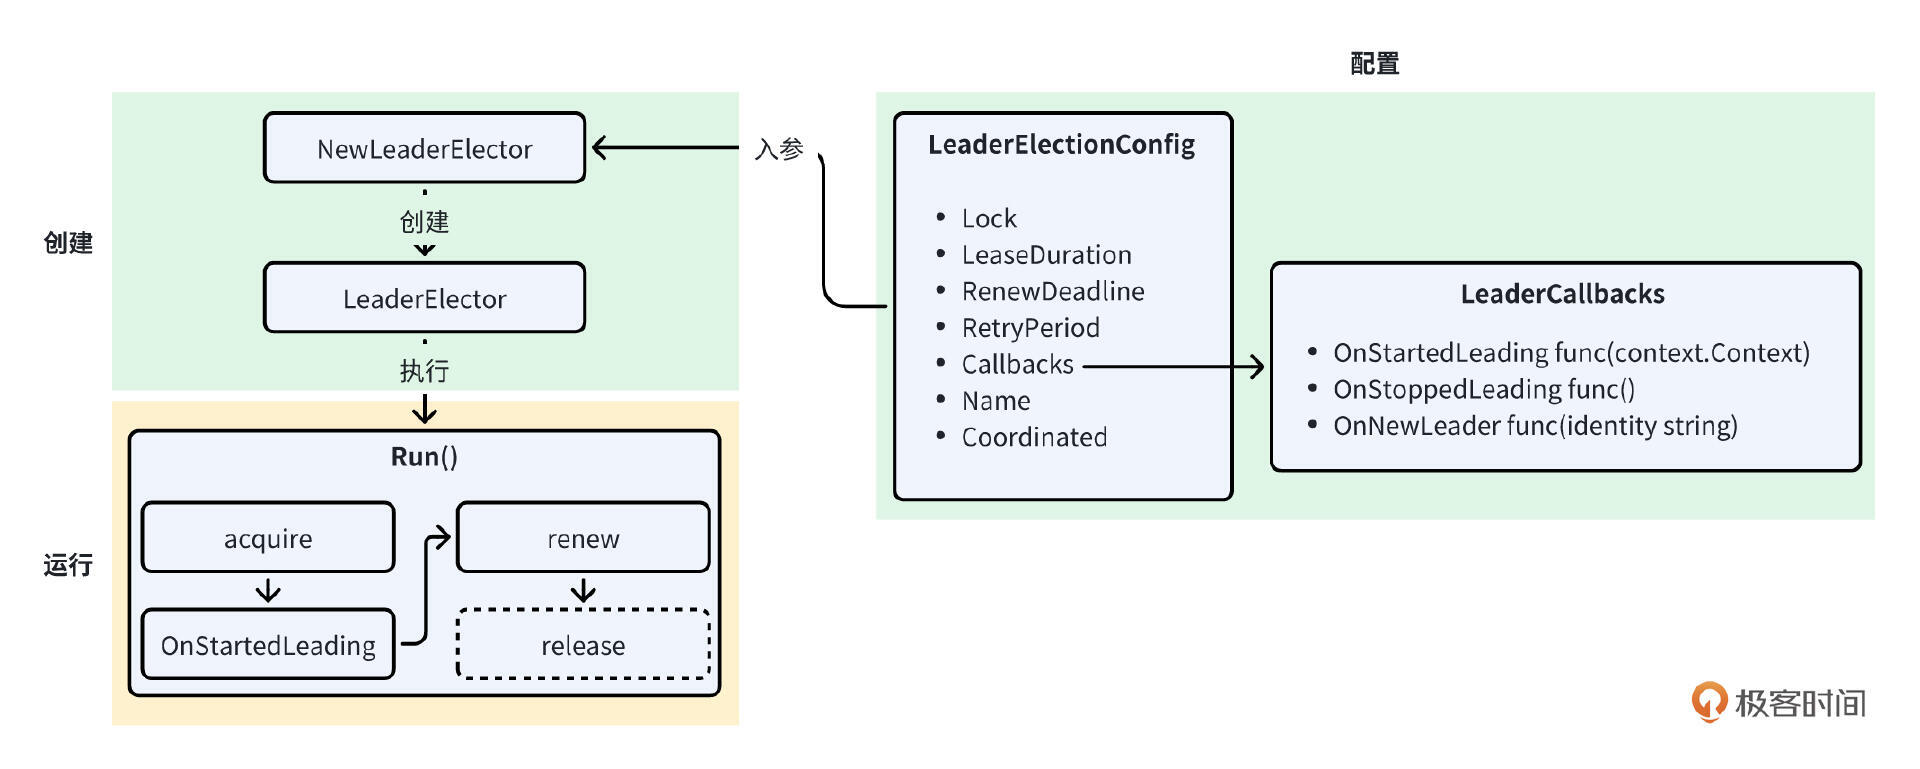
在 Go 中,设计一个功能的通用思路是先创建一个配置型 Go 结构体,用来保存功能的各类配置,再使用 NewXXX 或 CreateXXX 这类函数创建一个实例,然后调用实例的方法实现期望的功能。
Leader Election 的关键影响因素我们已经提到过很多次,例如:持锁时间、续约时间、回调函数、锁名称、抢锁间隔等。这些信息会保存在一个存储实体中,如 MySQL 表记录或 Kubernees 资源中。
上面是设计一个稍具规模的功能特性的一般设计思路,Kubernetes Leader Election 机制的设计和实现与其保持一致。具体包括以下几步:
-
创建 Leader Election 配置
-
创建 *LeaderElector 类型实例
-
运行 Leader Election 逻辑
-
运行业务逻辑
-
定期续约
步骤 1:创建 Leader Election 配置
首先,leaderelection 包定义了一个 LeaderElectionConfig 类型的结构体,结构体中包含了 Leader Election 需要的各类配置项:
type LeaderElectionConfig struct {
    // Lock is the resource that will be used for locking
    Lock rl.Interface

    // LeaseDuration is the duration that non-leader candidates will
    // wait to force acquire leadership. This is measured against time of
    // last observed ack.
    //
    // A client needs to wait a full LeaseDuration without observing a change to
    // the record before it can attempt to take over. When all clients are
    // shutdown and a new set of clients are started with different names against
    // the same leader record, they must wait the full LeaseDuration before
    // attempting to acquire the lease. Thus LeaseDuration should be as short as
    // possible (within your tolerance for clock skew rate) to avoid a possible
    // long waits in the scenario.
    //
    // Core clients default this value to 15 seconds.
    LeaseDuration time.Duration
    // RenewDeadline is the duration that the acting master will retry
    // refreshing leadership before giving up.
    //
    // Core clients default this value to 10 seconds.
    RenewDeadline time.Duration
    // RetryPeriod is the duration the LeaderElector clients should wait
    // between tries of actions.
    //
    // Core clients default this value to 2 seconds.
    RetryPeriod time.Duration

    // Callbacks are callbacks that are triggered during certain lifecycle
    // events of the LeaderElector
    Callbacks LeaderCallbacks

    // WatchDog is the associated health checker
    // WatchDog may be null if it's not needed/configured.
    WatchDog *HealthzAdaptor

    // ReleaseOnCancel should be set true if the lock should be released
    // when the run context is cancelled. If you set this to true, you must
    // ensure all code guarded by this lease has successfully completed
    // prior to cancelling the context, or you may have two processes
    // simultaneously acting on the critical path.
    ReleaseOnCancel bool

    // Name is the name of the resource lock for debugging
    Name string

    // Coordinated will use the Coordinated Leader Election feature
    // WARNING: Coordinated leader election is ALPHA.
    Coordinated bool
}
字段的含义你可以看注释,关键的字段前面也反复介绍过。接着,可以调用 NewLeaderElector 函数来创建一个 *LeaderElector 类型的实例。
步骤 2:创建 LeaderElector 类型实例
NewLeaderElector 函数实现如下:
// NewLeaderElector creates a LeaderElector from a LeaderElectionConfig
func NewLeaderElector(lec LeaderElectionConfig) (*LeaderElector, error) {
    if lec.LeaseDuration <= lec.RenewDeadline {
        return nil, fmt.Errorf("leaseDuration must be greater than renewDeadline")
    }
    if lec.RenewDeadline <= time.Duration(JitterFactor*float64(lec.RetryPeriod)) {
        return nil, fmt.Errorf("renewDeadline must be greater than retryPeriod*JitterFactor")
    }
    if lec.LeaseDuration < 1 {
        return nil, fmt.Errorf("leaseDuration must be greater than zero")
    }
    if lec.RenewDeadline < 1 {
        return nil, fmt.Errorf("renewDeadline must be greater than zero")
    }
    if lec.RetryPeriod < 1 {
        return nil, fmt.Errorf("retryPeriod must be greater than zero")
    }
    if lec.Callbacks.OnStartedLeading == nil {
        return nil, fmt.Errorf("OnStartedLeading callback must not be nil")
    }
    if lec.Callbacks.OnStoppedLeading == nil {
        return nil, fmt.Errorf("OnStoppedLeading callback must not be nil")
    }

    if lec.Lock == nil {
        return nil, fmt.Errorf("Lock must not be nil.")
    }
    id := lec.Lock.Identity()
    if id == "" {
        return nil, fmt.Errorf("Lock identity is empty")
    }

    le := LeaderElector{
        config:  lec,
        clock:   clock.RealClock{},
        metrics: globalMetricsFactory.newLeaderMetrics(),
    }
    le.metrics.leaderOff(le.config.Name)
    return &le, nil
}
NewLeaderElector 函数的入参是 LeaderElectionConfig 类型的实例,这个你应该很容易能理解。该函数内部基于互不信任原则校验了入参字段,这里再解释几个关键的校验项:
    // 领导者续约的时间间隔 RenewDeadline 要小于领导者持锁的时间。
    // 否则,会导致领导者还在等待续约超时的时候,就导致锁被释放,进而导致续锁失败
    if lec.LeaseDuration <= lec.RenewDeadline {
        return nil, fmt.Errorf("leaseDuration must be greater than renewDeadline")
    }
    if lec.RenewDeadline <= time.Duration(JitterFactor*float64(lec.RetryPeriod)) {
        return nil, fmt.Errorf("renewDeadline must be greater than retryPeriod*JitterFactor")
    }
在NewLeaderElector函数中,通过调用 lec.Lock.Identity() 方法生成了候选者唯一 ID:
    id := lec.Lock.Identity()
    if id == "" {
        return nil, fmt.Errorf("Lock identity is empty")
    }
Identity() 方法实现如下(Lease 锁的实现):
// Identity returns the Identity of the lock
func (ll *LeaseLock) Identity() string {
    return ll.LockConfig.Identity
}
Identity字段是在创建 Lease Lock 时指定的:
    lock := &resourcelock.LeaseLock{
        LeaseMeta: metav1.ObjectMeta{
            Name:      leaseLockName,
            Namespace: leaseLockNamespace,
        },
        Client: client.CoordinationV1(),
        LockConfig: resourcelock.ResourceLockConfig{
            Identity: id,
        },
    }
上面,我们通过 NewLeaderElector 函数创建了一个 *LeaderElector 类型的实例,接着就可以调用实例的 run 方法来启动整个 Leader Election 逻辑。
步骤 3:运行 Leader Election 逻辑
LeaderElector 实例的 run 方法实现如下:
func (le *LeaderElector) Run(ctx context.Context) {
    // 处理 Panic,防止业务代码 Panic,导致整个 Leader Election 逻辑 Panic
    defer runtime.HandleCrash()
    defer le.config.Callbacks.OnStoppedLeading()

    // 先去抢锁,阻塞操作
    if !le.acquire(ctx) {
        return // ctx signalled done
    }
    ctx, cancel := context.WithCancel(ctx)
    defer cancel()
    // 抢到锁后,执行主业务逻辑,通过 Callbacks.OnStartedLeading 回调启动
    go le.config.Callbacks.OnStartedLeading(ctx)
    // 抢到锁后,需要定期更新,确保自己一直持有该锁
    le.renew(ctx)
}
在 run 方法中,为了防止 Panic 导致整个 Leader Election 协程退出,使用了 defer runtime.HandleCrash() 来捕获并处理 Panic。需要注意的是,这里捕获的 Panic 主要是 OnStartedLeading Hook(业务主逻辑)函数抛出的 Panic。因为业务主逻辑中是否有 Panic,leaderelection 包是无法提前预知的,所以这里只能考虑最坏的情况,进而提高整个 Leader Election 运行时的稳定性。
接着,会调用 le.acquire(ctx) 函数抢锁。如果抢锁失败,直接返回;如果抢锁成功,则运行。这里,我们来看下 acquire 方法具体是如何抢锁的,acquire 方法实现如下:
// acquire loops calling tryAcquireOrRenew and returns true immediately when tryAcquireOrRenew succeeds.
// Returns false if ctx signals done.
func (le *LeaderElector) acquire(ctx context.Context) bool {
    ctx, cancel := context.WithCancel(ctx)
    defer cancel()
    succeeded := false
    desc := le.config.Lock.Describe()
    klog.Infof("attempting to acquire leader lease %v...", desc)
    wait.JitterUntil(func() {
        if !le.config.Coordinated {
            succeeded = le.tryAcquireOrRenew(ctx)
        } else {
            succeeded = le.tryCoordinatedRenew(ctx)
        }
        le.maybeReportTransition()
        if !succeeded {
            klog.V(4).Infof("failed to acquire lease %v", desc)
            return
        }
        le.config.Lock.RecordEvent("became leader")
        le.metrics.leaderOn(le.config.Name)
        klog.Infof("successfully acquired lease %v", desc)
        cancel()
    }, le.config.RetryPeriod, JitterFactor, true, ctx.Done())
    return succeeded
}
acquire方法主要是调用了 le.tryAcquireOrRenew(ctx) 方法来抢锁,通过 tryAcquireOrRenew 方法的名字,我们可以知道该方法会抢锁,如果抢到锁会续约。
acquire 方法中通过 wait.JitterUntil 函数来定期调用 le.tryAcquireOrRenew(ctx) 方法抢锁,直到成功为止。如果获取不到锁,则会以 RetryPeriod 为间隔不断尝试;如果获取到锁,就会调用 cancel() 函数,通知 wait.JitterUntil 停止尝试。tryAcquireOrRenew 是 Leader Election 实现中最核心的方法。
acquire 方法中的 le.maybeReportTransition() 调用很关键,会判断是否出现了 leader 的切换,进而调用 Callbacks 的 OnNewLeader 方法,尽管 kube-controller-manager 初始化时并没有设置这个 Callback 方法。maybeReportTransition 方法实现如下:
func (le *LeaderElector) maybeReportTransition() {
    if le.observedRecord.HolderIdentity == le.reportedLeader {
        return
    }
    le.reportedLeader = le.observedRecord.HolderIdentity
    if le.config.Callbacks.OnNewLeader != nil {
        go le.config.Callbacks.OnNewLeader(le.reportedLeader)
    }
}
acquire 方法中调用的 tryAcquireOrRenew 方法实现了核心的抢锁逻辑,其实现代码如下:
// tryAcquireOrRenew tries to acquire a leader lease if it is not already acquired,
// else it tries to renew the lease if it has already been acquired. Returns true
// on success else returns false.
func (le *LeaderElector) tryAcquireOrRenew(ctx context.Context) bool {
    now := metav1.NewTime(le.clock.Now())
    // 这个 leaderElectionRecord 就是保存在 Lease 资源 Spec 中的值。
    // 每个节点都将 HolderIdentity 设置为自己,以及关于获取和更新锁的时间。后面会对时间进行修正,才会更新到 API Server
    leaderElectionRecord := rl.LeaderElectionRecord{
        HolderIdentity:       le.config.Lock.Identity(),
        LeaseDurationSeconds: int(le.config.LeaseDuration / time.Second),
        RenewTime:            now,
        AcquireTime:          now,
    }

    // 1. fast path for the leader to update optimistically assuming that the record observed
    // last time is the current version.
    // 如果当前实例时Leader,并且 Lease 资源存在,则更新Lease资源
    if le.IsLeader() && le.isLeaseValid(now.Time) {
        oldObservedRecord := le.getObservedRecord()
        leaderElectionRecord.AcquireTime = oldObservedRecord.AcquireTime
        leaderElectionRecord.LeaderTransitions = oldObservedRecord.LeaderTransitions

        err := le.config.Lock.Update(ctx, leaderElectionRecord)
        if err == nil {
            le.setObservedRecord(&leaderElectionRecord)
            return true
        }
        klog.Errorf("Failed to update lock optimitically: %v, falling back to slow path", err)
    }

    // 2. obtain or create the ElectionRecord
    oldLeaderElectionRecord, oldLeaderElectionRawRecord, err := le.config.Lock.Get(ctx)
    if err != nil {
        if !errors.IsNotFound(err) {
            klog.Errorf("error retrieving resource lock %v: %v", le.config.Lock.Describe(), err)
            return false
        }
        // 记录不存在的话,则创建一条新的记录
        if err = le.config.Lock.Create(ctx, leaderElectionRecord); err != nil {
            klog.Errorf("error initially creating leader election record: %v", err)
            return false
        }

        le.setObservedRecord(&leaderElectionRecord)
        // 创建记录成功,同时表示获得了锁,返回 true
        return true
    }

    // 3. Record obtained, check the Identity & Time
    // 正常获取了锁资源的记录,检查锁持有者和更新时间。
    if !bytes.Equal(le.observedRawRecord, oldLeaderElectionRawRecord) {
        // 记录之前的锁持有者,其实有可能就是自己。
        le.setObservedRecord(oldLeaderElectionRecord)

        le.observedRawRecord = oldLeaderElectionRawRecord
    }
    // 在满足以下所有的条件下,认为锁由他人持有,并且还没有过期,返回 false
    // a. 当前锁持有者的并非自己
    // b. 上一次观察时间 + 观测检查间隔大于现在时间,即距离上次观测的间隔,小于 `LeaseDuration` 的设置值。
    if len(oldLeaderElectionRecord.HolderIdentity) > 0 && le.isLeaseValid(now.Time) && !le.IsLeader() {
        klog.V(4).Infof("lock is held by %v and has not yet expired", oldLeaderElectionRecord.HolderIdentity)
        return false
    }

    // 4. We're going to try to update. The leaderElectionRecord is set to it's default
    // here. Let's correct it before updating.
    // 在本函数开头 leaderElectionRecord 有一些字段被设置成了默认值,这里来设置正确的值。
    if le.IsLeader() {
        leaderElectionRecord.AcquireTime = oldLeaderElectionRecord.AcquireTime
        leaderElectionRecord.LeaderTransitions = oldLeaderElectionRecord.LeaderTransitions
        le.metrics.slowpathExercised(le.config.Name)
    } else {
        // 发生 leader 切换,所以 LeaderTransitions + 1
        leaderElectionRecord.LeaderTransitions = oldLeaderElectionRecord.LeaderTransitions + 1
    }

    // update the lock itself
    // 更新锁资源对象
    if err = le.config.Lock.Update(ctx, leaderElectionRecord); err != nil {
        klog.Errorf("Failed to update lock: %v", err)
        return false
    }

    le.setObservedRecord(&leaderElectionRecord)
    return true
}
tryAcquireOrRenew 方法本身不是一个阻塞操作,只返回 true/false,对应为获取到锁和没有获取到锁的状态。另外,在 Kubernetes 源码中,你会发现有大量的类似 tryAcquireOrRenew 这种函数:集创建和更新为一体,这种方式可以简化 Kubernetes 源码实现,提高了代码的复用度。
我们再来解释一下上述代码的核心逻辑。
首先,创建了一个 leaderElectionRecord 变量,该变量保存了锁的信息,变量设置了以下默认值:当前锁的持有者(ID)为当前实例 ID、续约时间为当前时间、获取锁的时间为当前时间。
接着,判断当前实例是否是 Leader,如果是 Leader,并且 Leader 处在持锁周期内,那么更新 Lease 资源。这里需要注意:
-
因为 Leader 没有切换,所以 AcquireTime 和 LeaderTransitions 需要为上一次的观察值。
-
因为 Leader 健康,所以这里只需要续约即可继续持有资源锁。
如果不是 Leader,说明有 2 种情况:Lease 资源不存在,或者 Lease 资源存在但当前实例不是 Leader。
接下来,会先通过调用 le.config.Lock.Get(ctx) 来获取 Lease 资源。如果没有 Lease 资源,则调用 le.config.Lock.Create(ctx, leaderElectionRecord) 新建一个 Lease 资源。这时候,当前实例也即为锁资源的持有者,抢锁成功并返回。
如果当前节点不是 Leader ,并且 Leader 持有锁的时间小于 LeaseDuration,说明候选节点还无法发起新一轮的 Leader 选举,返回抢锁失败。
如果当前节点是 Leader,并且不处在持锁周期内,说明资源锁已经被其他节点持有,这时候需要将资源锁的信息重新同步到本地的缓存中。
步骤 4:运行业务逻辑
在 run 方法中,抢锁成功后便会在 Go 协程中调用 OnStartedLeading 方法来运行业务逻辑。
步骤 5:定期续约
run 方法的最后会调用 le.renew(ctx) 定期续约以保持自己的 Leader 位置,renew 方法实现如下:
// renew loops calling tryAcquireOrRenew and returns immediately when tryAcquireOrRenew fails or ctx signals done.
func (le *LeaderElector) renew(ctx context.Context) {
    defer le.config.Lock.RecordEvent("stopped leading")
    ctx, cancel := context.WithCancel(ctx)
    defer cancel()
    wait.Until(func() {
        timeoutCtx, timeoutCancel := context.WithTimeout(ctx, le.config.RenewDeadline)
        defer timeoutCancel()
        err := wait.PollImmediateUntil(le.config.RetryPeriod, func() (bool, error) {
            if !le.config.Coordinated {
                return le.tryAcquireOrRenew(timeoutCtx), nil
            } else {
                return le.tryCoordinatedRenew(timeoutCtx), nil
            }
        }, timeoutCtx.Done())

        le.maybeReportTransition()
        desc := le.config.Lock.Describe()
        if err == nil {
            klog.V(5).Infof("successfully renewed lease %v", desc)
            return
        }
        le.metrics.leaderOff(le.config.Name)
        klog.Infof("failed to renew lease %v: %v", desc, err)
        cancel()
    }, le.config.RetryPeriod, ctx.Done())

    // if we hold the lease, give it up
    if le.config.ReleaseOnCancel {
        le.release()
    }
}
在 renew 方法中,wait.Until 方法会每隔 RetryPeriod 调用 le.tryAcquireOrRenew(timeoutCtx) 方法续约资源锁。
Leader Election 语法糖
通过上面的源码分析,我们知道要启用整个 Leader Election 需要执行以下步骤:创建配置 -> 创建 Leader Elector 实例 -> 执行 run 方法。leaderelection 提供了一个名为 RunOrDie 的语法糖函数,在该语法糖函数中,同时创建了 Leader Elector 实例,并调用了其 run 方法。RunOrDie 函数实现如下:
// RunOrDie starts a client with the provided config or panics if the config
// fails to validate. RunOrDie blocks until leader election loop is
// stopped by ctx or it has stopped holding the leader lease
func RunOrDie(ctx context.Context, lec LeaderElectionConfig) {
    le, err := NewLeaderElector(lec)
    if err != nil {
        panic(err)
    }
    if lec.WatchDog != nil {
        lec.WatchDog.SetLeaderElection(le)
    }
    le.Run(ctx)
}
在实际的 Kubernetes 开发中,通常是用 RunOrDie 函数来快捷启动整个 Leader Election 逻辑的。
资源锁实现
leaderelection.LeaderElectionConfig 中有一个 Lock 字段,类型为 k8s.io/client-go/tools/leaderelection/resourcelock.Interface,Interface 接口定义如下:
type Interface interface {
    // Get returns the LeaderElectionRecord
    Get(ctx context.Context) (*LeaderElectionRecord, []byte, error)

    // Create attempts to create a LeaderElectionRecord
    Create(ctx context.Context, ler LeaderElectionRecord) error

    // Update will update and existing LeaderElectionRecord
    Update(ctx context.Context, ler LeaderElectionRecord) error

    // RecordEvent is used to record events
    RecordEvent(string)

    // Identity will return the locks Identity
    Identity() string

    // Describe is used to convert details on current resource lock
    // into a string
    Describe() string
}
我们在调用 leaderelection.RunOrDie 运行 Leader Election 时,首先需要创建一个 resourcelock.Interface 类型的实例。例如,在本节课开始的实战部分,创建了一个leases 类型的 Lock:
    lock := &resourcelock.LeaseLock{
        LeaseMeta: metav1.ObjectMeta{
            Name:      leaseLockName,
            Namespace: leaseLockNamespace,
        },
        Client: client.CoordinationV1(),
        LockConfig: resourcelock.ResourceLockConfig{
            Identity: id,
        },
    }
leases 是 Lock 的一个实现,leaderelection 还支持 endpoints、configmaps、endpointsleases、multilock 类型的锁,见文件:tools/leaderelection/resourcelock/interface.go。
那么,具体应该如何实现一个新的锁资源呢?这里,我们以 leases 锁为例。
Lease 是 Kubernetes 控制平面中通过 etcd 实现的一种 Leases 资源,主要用于提供分布式租约的控制机制。关于该 API 的描述可参考:Lease 。
在 Kubernetes 集群中,我们可以使用如下命令来查看对应的 lease:
$ kubectl get leases -A
NAMESPACE         NAME                      HOLDER                                                AGE
kube-node-lease   master-machine            master-machine                                        3d19h
kube-system       kube-controller-manager   master-machine_06730140-a503-487d-850b-1fe1619f1fe1   3d19h
kube-system       kube-scheduler            master-machine_1724e2d9-c19c-48d7-ae47-ee4217b27073   3d19h

$ kubectl describe leases kube-controller-manager -n kube-system
Name:         kube-controller-manager
Namespace:    kube-system
Labels:       <none>
Annotations:  <none>
API Version:  coordination.k8s.io/v1
Kind:         Lease
Metadata:
  Creation Timestamp:  2022-06-24T11:01:51Z
  Managed Fields:
    API Version:  coordination.k8s.io/v1
    Fields Type:  FieldsV1
    fieldsV1:
      f:spec:
        f:acquireTime:
        f:holderIdentity:
        f:leaseDurationSeconds:
        f:leaseTransitions:
        f:renewTime:
    Manager:         kube-controller-manager
    Operation:       Update
    Time:            2022-06-24T11:01:51Z
  Resource Version:  56012
  Self Link:         /apis/coordination.k8s.io/v1/namespaces/kube-system/leases/kube-controller-manager
  UID:               851a32d2-25dc-49b6-a3f7-7a76f152f071
Spec:
  Acquire Time:            2022-06-27T15:30:46.000000Z
  Holder Identity:         master-machine_06730140-a503-487d-850b-1fe1619f1fe1
  Lease Duration Seconds:  15
  Lease Transitions:       2
  Renew Time:              2022-06-28T06:09:26.837773Z
Events:                    <none>
下面来看下 leases 锁的实现,leases 锁实现了资源锁的抽象。leases 锁定义如下:
type LeaseLock struct {
    // LeaseMeta 就是类似于其他资源类型的属性,包含name、namespace 以及其他关于 lease 的属性
    LeaseMeta  metav1.ObjectMeta
    // Client 就是提供了informer中的功能
    Client     coordinationv1client.LeasesGetter
    // lockconfig 包含上面通过 describe 看到的 Identity 与 recoder 用于记录资源锁的更改
    LockConfig ResourceLockConfig
    // lease 就是 API 中的 Lease 资源,可以参考下上面给出的这个 API 的使用
    lease      *coordinationv1.Lease
}
接下来,我们再看看 LeaseLock 实现了哪些方法。
首先是Get 方法:获取选举记录。Get 用来从 LeaseSpec 中返回选举的记录 *LeaderElectionRecord,其实现代码如下:
// Get returns the election record from a Lease spec
func (ll *LeaseLock) Get(ctx context.Context) (*LeaderElectionRecord, []byte, error) {
    lease, err := ll.Client.Leases(ll.LeaseMeta.Namespace).Get(ctx, ll.LeaseMeta.Name, metav1.GetOptions{})
    if err != nil {
        return nil, nil, err
    }
    ll.lease = lease
    record := LeaseSpecToLeaderElectionRecord(&ll.lease.Spec)
    recordByte, err := json.Marshal(*record)
    if err != nil {
        return nil, nil, err
    }
    return record, recordByte, nil
}

// 可以看出是返回这个资源spec里面填充的值
func LeaseSpecToLeaderElectionRecord(spec *coordinationv1.LeaseSpec) *LeaderElectionRecord {
    var r LeaderElectionRecord
    if spec.HolderIdentity != nil {
        r.HolderIdentity = *spec.HolderIdentity
    }
    if spec.LeaseDurationSeconds != nil {
        r.LeaseDurationSeconds = int(*spec.LeaseDurationSeconds)
    }
    if spec.LeaseTransitions != nil {
        r.LeaderTransitions = int(*spec.LeaseTransitions)
    }
    if spec.AcquireTime != nil {
        r.AcquireTime = metav1.Time{Time: spec.AcquireTime.Time}
    }
    if spec.RenewTime != nil {
        r.RenewTime = metav1.Time{Time: spec.RenewTime.Time}
    }
    if spec.PreferredHolder != nil {
        r.PreferredHolder = *spec.PreferredHolder
    }
    if spec.Strategy != nil {
        r.Strategy = *spec.Strategy
    }
    return &r
}
然后是Create 方法:创建一个租约。Create 是在 Kubernetes 集群中尝试去创建一个租约,可以看到,Client 就是 API 提供的对应资源的 REST 客户端,结果会在 Kubernetes 集群中创建这个 Lease。Create 方法实现如下:
// Create attempts to create a Lease
func (ll *LeaseLock) Create(ctx context.Context, ler LeaderElectionRecord) error {
    var err error
    ll.lease, err = ll.Client.Leases(ll.LeaseMeta.Namespace).Create(ctx, &coordinationv1.Lease{
        ObjectMeta: metav1.ObjectMeta{
            Name:      ll.LeaseMeta.Name,
            Namespace: ll.LeaseMeta.Namespace,
        },
        Spec: LeaderElectionRecordToLeaseSpec(&ler),
    }, metav1.CreateOptions{})
    return err
}
接着是Update 方法,用来更新 LeaseSpec,代码实现如下:
// Update will update an existing Lease spec.
func (ll *LeaseLock) Update(ctx context.Context, ler LeaderElectionRecord) error {
    if ll.lease == nil {
        return errors.New("lease not initialized, call get or create first")
    }
    ll.lease.Spec = LeaderElectionRecordToLeaseSpec(&ler)

    lease, err := ll.Client.Leases(ll.LeaseMeta.Namespace).Update(ctx, ll.lease, metav1.UpdateOptions{})
    if err != nil {
        return err
    }

    ll.lease = lease
    return nil
}
下一个是RecordEvent 方法,用来记录选举时出现的各类事件,代码实现如下:
// RecordEvent in leader election while adding meta-data
func (ll *LeaseLock) RecordEvent(s string) {
    if ll.LockConfig.EventRecorder == nil {
        return
    }
    events := fmt.Sprintf("%v %v", ll.LockConfig.Identity, s)
    subject := &coordinationv1.Lease{ObjectMeta: ll.lease.ObjectMeta}
    // Populate the type meta, so we don't have to get it from the schema
    subject.Kind = "Lease"
    subject.APIVersion = coordinationv1.SchemeGroupVersion.String()
    ll.LockConfig.EventRecorder.Eventf(subject, corev1.EventTypeNormal, "LeaderElection", events)
}
最后是Describe 方法,用来返回当前锁的字符串信息,代码实现如下:
// Describe is used to convert details on current resource lock
// into a string
func (ll *LeaseLock) Describe() string {
    return fmt.Sprintf("%v/%v", ll.LeaseMeta.Namespace, ll.LeaseMeta.Name)
}
可以看到 Describe 方法以字符串的形式返回了 Lease 资源的命名空间和名字信息,例如:kube-system/kube-controller-manager。
课程总结
本节课围绕 Kubernetes 的 Leader Election 的使用和实现展开。
首先演示了如何使用 Lease 资源实现 Leader Election:配置命令行参数、创建客户端与 Lease 锁,调用 RunOrDie 函数启动选举,通过多终端实验展示了 Leader 切换过程。
接着,我们重点剖析 k8s.io/client-go/tools/leaderelection 包中的 Leader Election 实现源码,为你讲解其实现步骤。创建 LeaderElectionConfig 配置、生成 LeaderElector 实例、运行选举逻辑(抢锁、执行业务、定期续约),并介绍了 RunOrDie 语法糖及 LeaseLock 的具体实现方法,包括 Get、Create 等核心方法。
k8s.io/client-go/tools/leaderelection 支持的锁资源是可以扩展的,本节课最后展示了应该如何开发一个新的锁资源。
课后练习
- leaderelection 包中的 LeaderElectionConfig 类型中的 Lock 字段是一个接口类型:
type Interface interface {
    // Get returns the LeaderElectionRecord
    Get(ctx context.Context) (*LeaderElectionRecord, []byte, error)

    // Create attempts to create a LeaderElectionRecord
    Create(ctx context.Context, ler LeaderElectionRecord) error

    // Update will update and existing LeaderElectionRecord
    Update(ctx context.Context, ler LeaderElectionRecord) error

    // RecordEvent is used to record events
    RecordEvent(string)

    // Identity will return the locks Identity
    Identity() string

    // Describe is used to convert details on current resource lock
    // into a string
    Describe() string
}
也就是说,你可以扩展 leaderelection 所支持的资源锁类型(当前有 ConfigMap、Endpoints、Lease),试着实现一个基于 MySQL 的资源锁。
欢迎你在留言区与我交流讨论,如果今天的内容让你有所收获,也欢迎转发给有需要的朋友,我们下节课再见!
精选留言