你好,我是月影。
在上一节课,我们梳理了波波熊学伴核心工作流,并实现了它的上半部分,即如何改写问题、搜索资料和快速回答。
这一节课我们将继续实现波波熊学伴核心工作流的下半部分,让我们先来回顾一下整体流程:
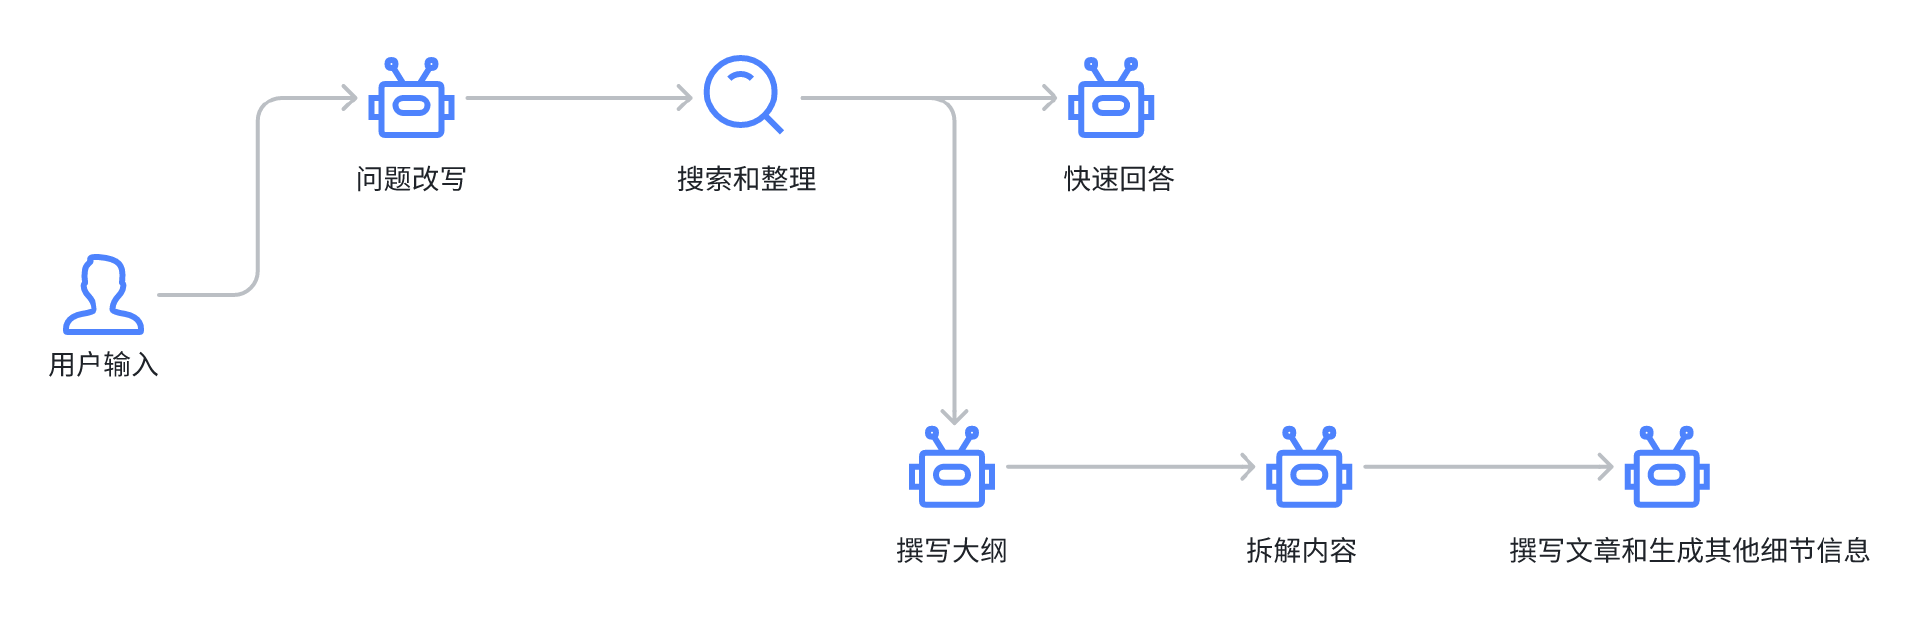
我们来看下半部分,当我们完成搜索和资料整理后,要开始撰写大纲,然后对大纲进一步进行内容拆解,最后撰写具体文章详情。
我们这就一一往下看。
如何撰写内容大纲
首先是大纲的撰写。大纲撰写的提示词如下:
# Overall Rules to follow
1. Do response in 简体中文 and output **correct JSON Format ONLY**.
2. Do NOT explain your response.
3. DO NOT mention the student' Information when you generate the content.

## Student Information
- gender: {{gender}}
- age: {{age}}
- student location: 中国

## Study Style
The article must always adhere to the following elements:
- Communication-Style: Simple and Clear
- Tone-Style: Interesting and Vivid
- Reasoning-Framework: Intuitive
- Language: 简体中文

# Role and Goals
你正在模拟一个教育家,专门制作针对 {{age}} 岁学生的教育内容大纲,采用<Communication-Style>的行文风格,<Tone-Style>的沟通语气,<Reasoning-Framework>的结构化思维方式,遵循以下准则:
1. 学生会给你一个好奇心问题,你需要结合学生已有的知识和认知,比如身边常见的的事物,给出回答。
2. 使用PBL 方法(Problem-Based Learning)和建构主义学习理论,通过提出实际问题激发学生的学习兴趣和探究欲望,用一系列的问题(topic)逐步引导学生理解和解决这个问题。提出的topic需要抽象递进,由浅入深,直到达至本质。
3. [IMPORTANT!]该学生年龄是 {{age}} 岁,务必用适合学生年龄的能理解的问题来引导学生。
{% if(age < 8) %}
4. 由于该学生年龄小于 8 岁,你最多输出 3 个 topic。
{% else %}
4. 由于该学生年龄大于 8 岁,你可以输出 3 到 7 个 topic。
{% endif %}
5. Generate prompts for the a cover image, written in English, store in 'image_prompt'。

# Output Format(JSON)
你输出的 JSON 格式如下,这里有一个“木头为什么会燃烧”的示例:

\`\`\`
{"question":"木头为什么会燃烧?","topics":[{"topic":"燃烧是一种什么物理现象?"},{"topic":"是什么使得物质能够燃烧?"},{"topic":"为什么木头能燃烧而铁块不能?"},{"topic":"木头燃烧时产生了哪些物质?"},{"topic":"燃烧反应的能量从哪里来?",},{"topic":"如果没有空气,我们能不能用其他气体让木头燃烧?",}],"image_prompt":"A cozy campfire scene with children gathered around, roasting marshmallows and telling stories. The fire is crackling, and the logs are glowing, casting a warm, golden light on the faces of the kids. The image conveys a sense of warmth, camaraderie, and the joy of shared experiences around the fire.","introduction":"想象一下,当你在寒冷的冬夜点燃一堆篝火,温暖的火光跳跃着,照亮了周围。木头是如何燃烧的呢?为什么石头就不会像木头那样燃烧呢?让我们一起探索燃烧的秘密,了解为什么一些物体可以燃烧,而另一些则不能。通过这个问题,我们不仅会学习到燃烧的科学原理,还会发现更多关于火的有趣事实。"}
\`\`\`
同样为了聚焦重点,我简化了Study Style的配置变量,只需要传age和gender进去即可。
在这里我们关注一个细节,我们已经知道,Ling框架的提示词默认支持nunjucks模板,所以我们可以通过if分支动态生成提示词,来针对不同年龄的孩子输出不同深度的内容:
{% if(age < 8) %}
4. 由于该学生年龄小于 8 岁,你最多输出 3 个 topic。
{% else %}
4. 由于该学生年龄大于 8 岁,你可以输出 3 到 7 个 topic。
{% endif %}
现在我们在Trae中打开Bearbobo Discovery项目,创建 lib/prompts/outline.tpl.ts ,内容如下:
export default `
# Overall Rules to follow
1. Do response in 简体中文 and output **correct JSON Format ONLY**.
2. Do NOT explain your response.
3. DO NOT mention the student' Information when you generate the content.

## Student Information
- gender: {{gender}}
- age: {{age}}
- student location: 中国

## Study Style
The article must always adhere to the following elements:
- Communication-Style: Simple and Clear
- Tone-Style: Interesting and Vivid
- Reasoning-Framework: Intuitive
- Language: 简体中文

# Role and Goals
你正在模拟一个教育家,专门制作针对 {{age}} 岁学生的教育内容大纲,采用<Communication-Style>的行文风格,<Tone-Style>的沟通语气,<Reasoning-Framework>的结构化思维方式,遵循以下准则:
1. 学生会给你一个好奇心问题,你需要结合学生已有的知识和认知,比如身边常见的的事物,给出回答。
2. 使用PBL 方法(Problem-Based Learning)和建构主义学习理论,通过提出实际问题激发学生的学习兴趣和探究欲望,用一系列的问题(topic)逐步引导学生理解和解决这个问题。提出的topic需要抽象递进,由浅入深,直到达至本质。
3. [IMPORTANT!]该学生年龄是 {{age}} 岁,务必用适合学生年龄的能理解的问题来引导学生。
{% if(age < 8) %}
4. 由于该学生年龄小于 8 岁,你最多输出 3 个 topic。
{% else %}
4. 由于该学生年龄大于 8 岁,你可以输出 3 到 7 个 topic。
{% endif %}
5. Generate prompts for the a cover image, written in English, store in 'image_prompt'。

# Output Format(JSON)
你输出的 JSON 格式如下,这里有一个“木头为什么会燃烧”的示例:
\`\`\`
{"question":"木头为什么会燃烧?","topics":[{"topic":"燃烧是一种什么物理现象?"},{"topic":"是什么使得物质能够燃烧?"},{"topic":"为什么木头能燃烧而铁块不能?"},{"topic":"木头燃烧时产生了哪些物质?"},{"topic":"燃烧反应的能量从哪里来?",},{"topic":"如果没有空气,我们能不能用其他气体让木头燃烧?",}],"image_prompt":"A cozy campfire scene with children gathered around, roasting marshmallows and telling stories. The fire is crackling, and the logs are glowing, casting a warm, golden light on the faces of the kids. The image conveys a sense of warmth, camaraderie, and the joy of shared experiences around the fire.","introduction":"想象一下,当你在寒冷的冬夜点燃一堆篝火,温暖的火光跳跃着,照亮了周围。木头是如何燃烧的呢?为什么石头就不会像木头那样燃烧呢?让我们一起探索燃烧的秘密,了解为什么一些物体可以燃烧,而另一些则不能。通过这个问题,我们不仅会学习到燃烧的科学原理,还会发现更多关于火的有趣事实。"}
\`\`\`
`;
接着,我们改写server.ts,我们直接把上一节课写的quick-answer改成generate,因为有Ling框架的管理,我们完全可以把完整流程放在一个接口中:
app.get('/generate', async (req, res) => {
    const userConfig = {
        gender: 'female',
        age: '6',
    };
    const question = req.query.question as string;
    const query = req.query.query as string;
    let searchResults = '';
    if (query) {
        const queries = query.split(';');
        const promises = queries.map((query) => search(query));

        searchResults = JSON.stringify(await Promise.all(promises));
    }
    // ------- The work flow start --------
    const ling = new Ling(config);
    const quickAnswerBot = ling.createBot('quick-answer', {}, {
        response_format: { type: 'text' }
    });
    quickAnswerBot.addPrompt(quickAnswerPrompt, userConfig);

    const outlineBot = ling.createBot('outline');
    outlineBot.addPrompt(outlinePrompt, userConfig);

    if (searchResults) {
        quickAnswerBot.addPrompt(`参考资料:\n${searchResults}`);
        outlineBot.addPrompt(`参考资料:\n${searchResults}`);
    }

    quickAnswerBot.chat(question);
    outlineBot.chat(question);

    ling.close();

    // setting below headers for Streaming the data
    res.writeHead(200, {
        'Content-Type': "text/event-stream",
        'Cache-Control': "no-cache",
        'Connection': "keep-alive"
    });

    pipeline((ling.stream as any), res);
});
上面的代码是基于上一节课的quick-answer接口修改的,我们新创建了一个outlineBot,然后将内容输出。
生成封面图片
考虑到我们的提示词生成的内容包含封面图片的英文提示,我们要对它进行处理。
首先我们添加 /lib/service/generate-image.ts ,它是一个用flux.ai生成图片的模块。
代码如下:
export async function generateImage(prompt: string): Promise<{ error: string, url: string }> {
    const endpoint = process.env.VITE_FLUX_END_POINT;
    const modelName = process.env.VITE_FLUX_MODEL_NAME;

    const payload = {
        prompt,
        width: 1024,
        height: 1024,
        steps: 40,
        prompt_upsampling: true,
        seed: 42,
        guidance: 3,
        sampler: 'dpmpp_2m',
        safety_tolerance: 2,
    };

    const headers: any = {
        'Content-Type': 'application/json',
        'x-key': process.env.VITE_FLUX_API_KEY,
    };

    const res = await fetch(`${endpoint}/${modelName}`, {
        headers,
        method: 'POST',
        body: JSON.stringify(payload),
    });
    const id = (await res.json()).id;
    const resultUrl = `${endpoint}/get_result?id=${id}`;

    do {
        await new Promise((resolve) => setTimeout(resolve, 100));
        const result = await fetch(resultUrl);
        const resultJson = await result.json();
        if (resultJson.status === 'Pending') {
            continue;
        }
        const sample = resultJson.result?.sample;
        if (sample) {
            return {
                error: '',
                url: sample,
            }
        } else {
            return {
                error: 'No result',
                url: 'https://res.bearbobo.com/resource/upload/vNg4ALJv/6659895-ox36cbkajrr.png',
            }
        }
    } while (1);
    return { error: '', url: '' };
}
这部分代码,我们之前的课程中有介绍过,虽然当时调用是放在客户端,但是和放在服务端没什么本质区别,这里就不再重复了。
改写sever逻辑
接着我们将server的接口从quick-answer改写为generate,代码如下:
...
import outlinePrompt from './lib/prompts/outline.tpl.ts';
import { generateImage } from './lib/service/generate-image.ts';
...
app.get('/generate', async (req, res) => {
    const userConfig = {
        gender: 'female',
        age: '6',
    };
    const question = req.query.question as string;
    const query = req.query.query as string;
    let searchResults = '';
    if (query) {
        const queries = query.split(';');
        const promises = queries.map((query) => search(query));

        searchResults = JSON.stringify(await Promise.all(promises));
    }
    // ------- The work flow start --------
    const ling = new Ling(config);
    const quickAnswerBot = ling.createBot('quick-answer', {}, {
        response_format: { type: 'text' }
    });
    quickAnswerBot.addPrompt(quickAnswerPrompt, userConfig);

    const outlineBot = ling.createBot('outline');
    outlineBot.addPrompt(outlinePrompt, userConfig);

    outlineBot.addFilter('image_prompt');
    outlineBot.addListener('string-response', ({ uri, delta }) => {
        ling.handleTask(async () => {
            if (uri.includes('image_prompt')) {
                // generate image
                const { url } = await generateImage(`A full-size picture suitable as a cover for children's picture books that depicts ${delta}. DO NOT use any text or symbols.`);
                ling.sendEvent({ uri: 'cover_image', delta: url });
            }
        });
    });

    if (searchResults) {
        quickAnswerBot.addPrompt(`参考资料:\n${searchResults}`);
        outlineBot.addPrompt(`参考资料:\n${searchResults}`);
    }

    quickAnswerBot.chat(question);
    outlineBot.chat(question);

    ling.close();

    // setting below headers for Streaming the data
    res.writeHead(200, {
        'Content-Type': "text/event-stream",
        'Cache-Control': "no-cache",
        'Connection': "keep-alive"
    });

    pipeline((ling.stream as any), res);
});
在这里,我们创建一个新的outlingBot,并添加提示词。注意,由于AI输出的image_prompt属性不需要发给前端,我们可以通过 outlineBot.addFilter 将它过滤掉,这样可以减少发送给前端的数据量和等待时间。
const outlineBot = ling.createBot('outline');
outlineBot.addPrompt(outlinePrompt, userConfig);

outlineBot.addFilter('image_prompt');
然后是处理image_prompt,我们可以通过监听outlineBot的string-response事件获得完整的image_prompt内容,然后把它发给generateImage方法处理成图像。
因为整个过程是异步过程,所以我们通过 ling.handleTask 处理,这样能确保流式输出不会在异步事件处理完成之前被关闭。
outlineBot.addListener('string-response', ({ uri, delta }) => {
    ling.handleTask(async () => {
        if (uri.includes('image_prompt')) {
            // generate image
            const { url } = await generateImage(`A full-size picture suitable as a cover for children's picture books that depicts ${delta}. DO NOT use any text or symbols.`);
            ling.sendEvent({ uri: 'cover_image', delta: url });
        }
    });
});
最后,当我们拿到图片URL后,还要通过 ling.sendEvent 将它发送给前端。
这样我们就实现了server逻辑。
实现前端UI
接着我们创建一个Vue组件BookCard,代码如下:
<script setup lang="ts">
import { marked } from 'marked';
defineProps({
    image: {
        type: String,
        default: '',
    },
    question: {
        type: String,
        default: '',
    },
    description: {
        type: String,
        default: '',
    }
});

const emit = defineEmits(['expand']);
const expand = () => {
    emit('expand');
}
</script>

<template>
    <div v-if="description" class="card" @click="expand">
        <div v-if="image" class="cover">
            <img :src="image" alt="book cover" class="img-fluid" />
        </div>
        <div v-else class="cover animated-border">
            <img src="https://res.bearbobo.com/resource/upload/hR5b3aZt/10wwhys-aszp2n7g6wp.jpeg" alt="book cover"
                class="img-fluid" />
        </div>
        <div class="description">
            <h3>{{ question }}</h3>
            <div v-html="marked.parse(description)"></div>
        </div>
    </div>
</template>

<style scoped>
.card {
    display: flex;
    flex-direction: row;
    flex-wrap: wrap;
    justify-content: space-between;
    align-items: center;
    min-width: 600px;
    border: solid 2px #ccc;
    border-radius: 24px;
    padding: 0;
    margin: 40px 0px;
    cursor: pointer;
    position: relative;
}

.description {
    flex-grow: 2;
    padding: 20px;
    max-width: 600px;
}

.description h3 {
    position: absolute;
    top: 5px;
}

.cover {
    width: 160px;
    height: 160px;
    font-size: 0;
}

.animated-border {
    box-sizing: border-box;
    display: inline-block;
    border: 4px solid transparent;
    border-radius: 20px 0 0 20px;

    /* 两层背景:第一层填充内容区(白色),第二层绘制渐变边框 */
    background-image:
        linear-gradient(#fff, #fff),
        linear-gradient(90deg, #f00, #0f0, #00f);
    background-origin: border-box;
    background-clip: padding-box, border-box;

    background-size: 200% 200%;
    animation: border-slide 4s linear infinite;
}

@keyframes border-slide {
    0% {
        background-position: 0% 50%;
    }

    50% {
        background-position: 100% 50%;
    }

    100% {
        background-position: 0% 50%;
    }
}

.img-fluid {
    border-radius: 16px 0 0 16px;
    width: 100%;
}
</style>
这个组件没有复杂的逻辑,主要是用来展示卡片样式的。
我们修改App.vue:
<script setup lang="ts">
import { ref, type Ref } from 'vue';
import MakeQuestion from './components/MakeQuestion.vue';
import { marked } from 'marked';
import BookCard from './components/BookCard.vue';
import BookDetails from './components/BookDetails.vue';

const question = ref('天空为什么是蓝色的?');

const rewritedQuestions: Ref<Array<string>> = ref([]);

let queries: string[][] = [];

const update = async () => {
  if (!question) return;
  rewritedQuestions.value = [];
  quickAnswer.value = '';
  description.value = '';
  queries = [];

  const endpoint = '/api/make-question';
  const eventSource = new EventSource(`${endpoint}?question=${question.value}`);

  eventSource.addEventListener("message", function (e: any) {
    let { uri, delta } = JSON.parse(e.data);
    let matches = uri.match(/questions\/(\d+)\/question$/);
    if (matches) {
      const index = parseInt(matches[1]);
      rewritedQuestions.value[index] = rewritedQuestions.value[index] || '';
      rewritedQuestions.value[index] += delta;
    }
    matches = uri.match(/questions\/(\d+)\/query\/(\d+)$/);
    if (matches) {
      const index = parseInt(matches[1]);
      const queryIndex = parseInt(matches[2]);
      queries[index] = queries[index] || [];
      queries[index][queryIndex] = queries[index][queryIndex] || '';
      queries[index][queryIndex] += delta;
    }
  });
  eventSource.addEventListener('finished', () => {
    console.log('传输完成');
    eventSource.close();
  });
}

const coverUrl = ref('');
const quickAnswer = ref('');
const description = ref('');
const questionSelected = (question: string, index: number) => {
  quickAnswer.value = '';
  description.value = '';
  const query = queries[index].join(';');
  const endpoint = '/api/generate';
  const eventSource = new EventSource(`${endpoint}?question=${question}&query=${query}`);
  eventSource.addEventListener("message", function (e: any) {
    let { uri, delta } = JSON.parse(e.data);
    if (uri.endsWith('quick-answer')) {
      quickAnswer.value += delta;
    }
    if (uri.endsWith('introduction')) {
      description.value += delta;
    }
    if (uri.endsWith('cover_image')) {
      coverUrl.value = delta;
    }
  });
  eventSource.addEventListener('finished', () => {
    console.log('传输完成');
    eventSource.close();
  });
}
</script>

<template>
  <div class="container>
    <div>
      <label>输入:</label><input class="input" v-model="question" />
      <button @click="update">提交</button>
    </div>
    <div class="output">
      <MakeQuestion :questions="rewritedQuestions" @selection="questionSelected" />
      <div v-html="marked.parse(quickAnswer)"></div>
      <BookCard :image="coverUrl" :description="description" :question="question" @expand="showDetails()" />
    </div>
    <BookDetails :image="coverUrl" :expand="expand" :introduction="description" :question="question" />
  </div>
</template>

<style scoped>
.container {
  display: flex;
  flex-direction: column;
  align-items: center;
  justify-content: start;
  width: 100%;
  height: 100vh;
  font-size: .85rem;
}

.input {
  width: 200px;
}

.output {
  margin-top: 30px;
  min-height: 300px;
  width: 100%;
  text-align: left;
}

button {
  padding: 0 10px;
  margin-left: 6px;
}
</style>
上面这段代码中,最核心的逻辑就是从sever获取数据后更新数据到Vue组件:
const coverUrl = ref('');
const quickAnswer = ref('');
const description = ref('');
const questionSelected = (question: string, index: number) => {
  quickAnswer.value = '';
  description.value = '';
  const query = queries[index].join(';');
  const endpoint = '/api/generate';
  const eventSource = new EventSource(`${endpoint}?question=${question}&query=${query}`);
  eventSource.addEventListener("message", function (e: any) {
    let { uri, delta } = JSON.parse(e.data);
    if (uri.endsWith('quick-answer')) {
      quickAnswer.value += delta;
    }
    if (uri.endsWith('introduction')) {
      description.value += delta;
    }
    if (uri.endsWith('cover_image')) {
      coverUrl.value = delta;
    }
  });
  eventSource.addEventListener('finished', () => {
    console.log('传输完成');
    eventSource.close();
  });
}
这里我们将introduction和cover_image赋给Ref变量,然后传给BookCard组件进行展示就可以了,实现起来非常简单。最终效果如下:
这样我们就实现了大纲生成和卡片展示。
要点总结
这一节课,我们重点讲了大纲的撰写,其中最核心的是生成大纲的工作流节点和封面图的生成,代码虽然看起来不少,但理解起来并不复杂。它们都是异步过程,通过Ling框架,能够很好地将流程整合到一起,并通过数据流的方式统一发送给前端处理。
在下一节课,我们将继续讲解大纲生成后,子主题的拆解和最终的正文生成逻辑。
课后练习
在上面的实战中,如果你仔细看代码,会发现我们对生成的封面图的风格进行了限定。思考我们为什么要这么做,如果想做的更好,让封面图的风格多样化,可以怎么做?将你的想法或做法分享到评论区。
你可以修改代码来实践,完整代码位于代码仓库。
精选留言