你好,我是王炜。
上一节,我们介绍了 K8s Pod 以及如何通过 Pod 部署容器镜像,学习了 K8s 交互工具 Kubectl 的基本操作。
那么,K8s 到底有什么强大之处让大家趋之若鹜呢?它又能给我们的业务带来哪些新的变化?我认为,其中最重要也是最吸引人的就是它的自动扩容和自愈机制。
这节课,我会继续延展上节课的内容,从传统 VM 的扩容和自愈出发,分析这种架构的缺点。然后,我会以我们之前部署的 Pod 为例,带你一步步在 K8s 上配置扩容和自愈,让你直观地感受 K8s 的强大优势。
在开始今天的演练之前,你需要做好以下准备:
- 准备一台电脑(首选 Linux 或 macOS,Windows 也适用,注意操作差异);
- 安装 Docker;
- 安装 Kubectl;
- 按上一节课的内容在本地创建 Kind 集群。
传统的扩容和自愈
在 VM 时代,我们的业务以进程的方式运行在虚拟机上,并由虚拟机对外提供服务。随着业务规模的扩大,我们需要支撑更多的访问流量,这时业务扩容就成了首先要考虑的问题。
在公有云环境下,VM 架构最典型的一种扩容方式是弹性伸缩组。意思是通过对虚拟机内存、CPU 等监控指标配置伸缩阈值,实现动态地自动伸缩。此外,我们一般还会结合虚拟机镜像、负载均衡器等云产品一并使用,如下图所示。
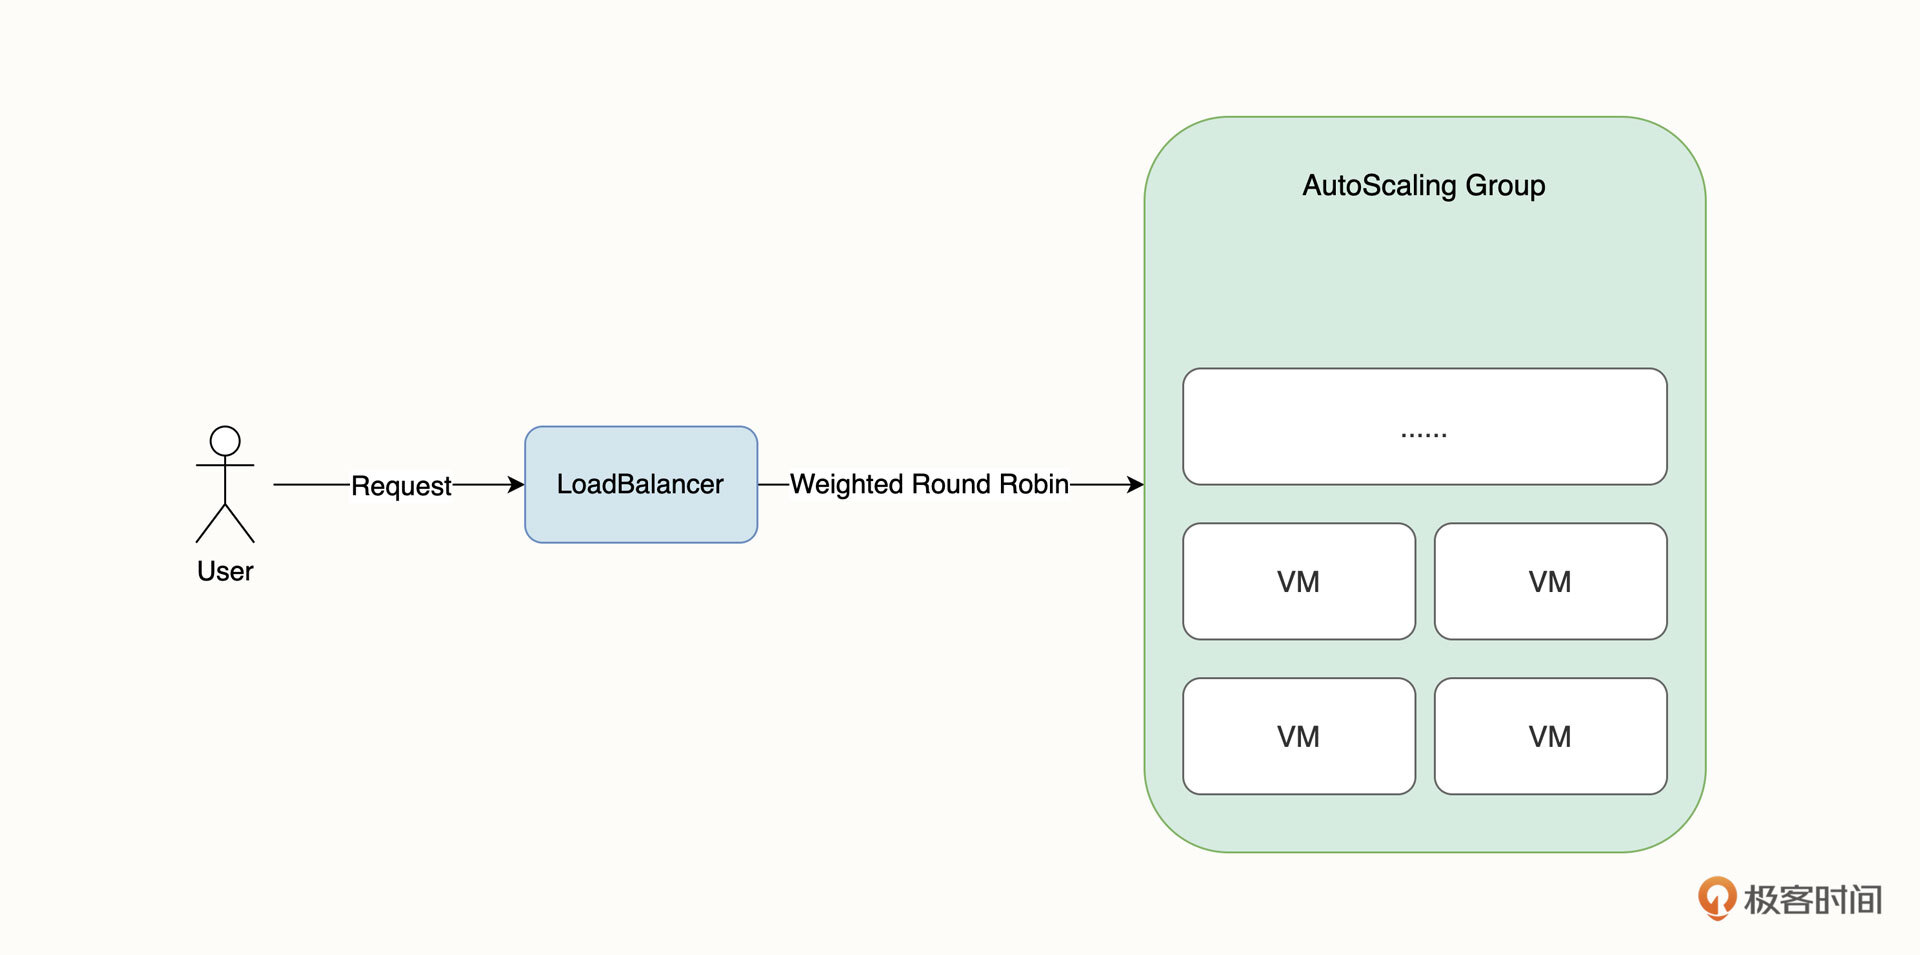
在这个架构中,负载均衡器是集群的唯一入口,它在接受访问流量后,一般会将流量通过加权轮训的方式转发到后端集群。负载均衡器一般是直接使用云厂商的产品,有一些团队也会自建高可用的 Nginx 作为集群入口。为了保证伸缩组节点的业务一致性,弹性伸缩组的所有 VM 都使用同一个虚拟机镜像。
其次,要在 VM 粒度实现业务自愈,常见的方案是使用 Crontab 定时检查业务进程或者通过守护进程的方式来运行,例如 Node PM2。
传统扩容和自愈的缺点
但是,这种架构有一些显而易见的缺陷。最大的问题有两个:
- 扩容慢;
- 负载均衡无法感知业务健康情况。
扩容慢主要体现在两方面。首先是 VM 指标会有一定的延迟;其次,扩容的 VM 冷启动时间比较慢,弹性伸缩组需要执行购买 VM、配置镜像、加入伸缩组、启动 VM 等操作。这会让我们失去扩容的最佳时机,并最终影响用户体验。
负载均衡无法感知业务健康情况的意思是,VM 是否加入到弹性伸缩组接收外部流量,一般取决于 VM 的健康状态,但 VM 健康并不等于业务健康,这导致在扩缩容的过程中,请求仍然有可能会转发至业务不健康的节点,造成业务短暂中断的问题。
K8s 的自动自愈
K8s是如何解决这两个问题的呢。
在详细介绍 K8s 的自愈之前,我想先问你一个简单的问题,你希望自愈解决什么问题?
我想,你可能最希望自愈能够帮我们解决服务自动重启的问题。也就是说,当业务进程意外中断,或者节点产生故障时,系统可以快速识别,自动重启并恢复服务。其次,你可能还会希望自愈能够自动转移故障,也就是让业务不健康的节点不接收流量,保证用户体验。
听起来是不是很棒,而 K8s 的自动自愈功能都可以帮你解决上面的这些问题,我们终于能摆脱 7*24 小时 Oncall 了。
接下来我们进入实战环节。
还记得我们上节课学习的工作负载吗?在将镜像部署到 K8s 集群时,我们创建了一个 Pod 工作负载类型。在这节课的实战环节里,我们需要创建另一种工作负载类型:Deployment。
听起来似乎很陌生,别担心,我们先不讲概念,让我们先动手创建一个 Deployment 工作负载。
通常,我们需要像创建 Pod 那样先编写 Manifest,再通过 kubectl apply 命令来创建工作负载。但是由于 Deployment 的字段定义比较多,理解起来也相对复杂,这里我先提供另一种相对简单的办法,那就是 kubectl create 命令:
$ kubectl create deployment hello-world-flask --image=lyzhang1999/hello-world-flask:latest --replicas=2
deployment.apps/hello-world-flask created
在这里,hello-world-flask 代表工作负载的名称,–image 代表镜像,也就是我们在上一节课部署的镜像,–replicas 指的是 Pod 副本数,你可以把它类比为弹性伸缩组的 VM 数量。
本质上,你可以理解为这条命令会生成 Deployment Manifest,然后自动执行 kubectl apply 将 Manifest 应用到集群内,省略了我们手动编写 Manifest 的过程。你还可以为上面的命令增加 --dry-run 和 -o 参数,单纯输出 Manifest 内容。
$ kubectl create deployment hello-world-flask --image lyzhang1999/hello-world-flask:latest --replicas=2 --dry-run=client -o yaml
apiVersion: apps/v1
kind: Deployment
metadata:
  creationTimestamp: null
  labels:
    app: hello-world-flask
  name: hello-world-flask
spec:
  replicas: 2
  selector:
    matchLabels:
      app: hello-world-flask
  strategy: {}
  template:
    metadata:
      creationTimestamp: null
      labels:
        app: hello-world-flask
    spec:
      containers:
      - image: lyzhang1999/hello-world-flask:latest
        name: hello-world-flask
        resources: {}
status: {}
上面输出的 Manifest 其实就是我们应用到集群内的 Manifest 内容,可以看出,各参数都符合我们的预期。
然后,我们使用 kubectl create service 命令创建 Service:
$ kubectl create service clusterip hello-world-flask --tcp=5000:5000
service/hello-world-flask created
此外,我们还需要使用 kubectl create ingress 命令创建 Ingress:
$ kubectl create ingress hello-world-flask --rule="/=hello-world-flask:5000"
ingress.networking.k8s.io/hello-world-flask created
最后,别忘了部署 Ingress-nginx:
$ kubectl create -f https://ghproxy.com/https://raw.githubusercontent.com/lyzhang1999/resource/main/ingress-nginx/ingress-nginx.yaml
namespace/ingress-nginx created
serviceaccount/ingress-nginx created
serviceaccount/ingress-nginx-admission created
......
这里出现了几个陌生的概念,例如 Deployment、Service 和 Ingress。别担心,现在你并不需要理解他们,这部分内容我会在接下来的课程中为你详细介绍。
现阶段,你只需要知道三件事:
- Pod 会被 Deployment 工作负载管理起来,例如创建和销毁等;
- Service 相当于弹性伸缩组的负载均衡器,它能以加权轮训的方式将流量转发到多个 Pod 副本上;
- Ingress 相当于集群的外网访问入口。
接下来,让我们开始 K8s 自愈实验。
首先,我们要通过 kubectl get pods 列出 Pod:
$ kubectl get pods
NAME                                 READY   STATUS    RESTARTS   AGE
hello-world-flask-56fbff68c8-2xz7w   1/1     Running   0          3m38s
hello-world-flask-56fbff68c8-4f9qz   1/1     Running   0          3m38s
从返回结果可以看出,Deployment 为我们创建了两个 Pod 副本,它们拥有不同的名字。(与上一节课手动部署的 Pod 不同,通过 Deployment 创建的 Pod 带有随机后缀。)
由于之前我们已经通过 Kind 在本地创建了集群,也暴露监听了本地的 80 端口,所以集群的 Ingress 访问入口是 127.0.0.1。
有了 Ingress,我们访问 Pod 就不再需要进行端口转发了,我们可以直接访问 127.0.0.1。下面的命令会每隔 1 秒钟发送一次请求,并打印出时间和返回内容:
$ while true; do sleep 1; curl http://127.0.0.1; echo -e '\n'$(date);done
Hello, my first docker images! hello-world-flask-56fbff68c8-4f9qz
2022年 9月 7日 星期三 19时21分03秒 CST
Hello, my first docker images! hello-world-flask-56fbff68c8-2xz7w
2022年 9月 7日 星期三 19时21分04秒 CST
在这里,“Hello, my first docker images” 后面紧接的内容是 Pod 名称。通过返回内容我们会发现,请求被平均分配到了两个 Pod 上,Pod 名称是交替出现的。我们要保留这个命令行窗口,以便继续观察。
接下来,我们模拟其中的一个 Pod 宕机,观察返回内容。
打开一个新的命令行窗口,执行下面的命令终止容器内的 Python 进程,这个操作是在模拟进程意外中止导致宕机的情况。
$ kubectl exec -it hello-world-flask-56fbff68c8-2xz7w -- bash -c "killall python3"
然后,我们回到刚才的请求窗口查看返回内容,可以看到非常神奇的一幕:
Hello, my first docker images! hello-world-flask-56fbff68c8-4f9qz
2022年 9月 7日 星期三 19时27分44秒 CST
Hello, my first docker images! hello-world-flask-56fbff68c8-4f9qz
2022年 9月 7日 星期三 19时27分45秒 CST
Hello, my first docker images! hello-world-flask-56fbff68c8-4f9qz
所有的请求流量都被转发到了没有故障的 Pod,也就是说,故障成功地被转移了!
等待几秒钟,继续观察,我们会重新发现 hello-world-flask-56fbff68c8-2xz7w Pod 的返回内容,这说明 Pod 被重启恢复后,重新加入到了负载均衡接收外部流量:
Hello, my first docker images! hello-world-flask-56fbff68c8-2xz7w
2022年 9月 7日 星期三 19时27分52秒 CST
Hello, my first docker images! hello-world-flask-56fbff68c8-4f9qz
2022年 9月 7日 星期三 19时27分53秒 CST
Hello, my first docker images! hello-world-flask-56fbff68c8-2xz7w
然后,我们再次使用 kubectl get pods 查看 Pod:
$ kubectl get pods
NAME                                 READY   STATUS    RESTARTS   AGE
hello-world-flask-56fbff68c8-2xz7w   1/1     Running   1(1m ago)  3m38s
hello-world-flask-56fbff68c8-4f9qz   1/1     Running   0          3m38s
这里要注意看, hello-world-flask-56fbff68c8-2xz7w Pod 的 RESTARTS 值为 1 ,也就是说 K8s 自动帮我们重启了这个 Pod。
好了,让我们重新来梳理一下全过程。首先, K8s 感知到了业务 Pod 故障,立刻进行了故障转移并隔离了有故障的 Pod,并将请求转发到了其他健康的 Pod 中。随后重启了有故障的 Pod,最后将重启后的 Pod 加入到了负载均衡并开始接收外部请求。这些过程都是自动化完成的。
到这里,我们完成了 K8s 自愈的实验。有了 K8s 的自愈功能,我们就不再需要为潜在的业务中断问题而烦恼了。
K8s 的自动扩容
除了自愈功能以外,K8s 还为我们提供了自动扩容的能力。
自动扩容依赖于 K8s Metric Server 提供的监控指标,首先我们需要安装它:
$ kubectl apply -f https://ghproxy.com/https://raw.githubusercontent.com/lyzhang1999/resource/main/metrics/metrics.yaml
serviceaccount/metrics-server created
clusterrole.rbac.authorization.k8s.io/system:aggregated-metrics-reader created
clusterrole.rbac.authorization.k8s.io/system:metrics-server created
......
安装完成后,等待 Metric 工作负载就绪:
$ kubectl wait deployment -n kube-system metrics-server --for condition=Available=True --timeout=90s
deployment.apps/metrics-server condition met
Metric Server 就绪后,通过 kubectl autoscale 命令来为 Deployment 创建自动扩容策略:
$ kubectl autoscale deployment hello-world-flask --cpu-percent=50 --min=2 --max=10
这其中,–cpu-percent 表示 CPU 使用率阈值,当 CPU 超过 50% 时将进行自动扩容,–min 代表最小的 Pod 副本数,–max 代表最大扩容的副本数。也就是说,自动扩容会根据 CPU 的使用率在 2 个副本和 10 个副本之间进行扩缩容。
最后,要使自动扩容生效,还需要为我们刚才部署的 hello-world-flask Deployment 设置资源配额。你可以通过下面的命令来配置:
$ kubectl patch deployment hello-world-flask --type='json' -p='[{"op": "add", "path": "/spec/template/spec/containers/0/resources", "value": {"requests": {"memory": "100Mi", "cpu": "100m"}}}]'
deployment.apps/hello-world-flask patched
现在,Deployment 将会重新创建两个新的 Pod,你可以使用下面的命令筛选出新的 Pod:
$ kubectl get pod --field-selector=status.phase==Running
NAME                                 READY   STATUS    RESTARTS   AGE
hello-world-flask-64dd645c57-4clbp   1/1     Running   0          117s
hello-world-flask-64dd645c57-cc6g6   1/1     Running   0          117s
选择一个 Pod 并使用 kubectl exec 进入到容器内:
$ kubectl exec -it hello-world-flask-64dd645c57-4clbp -- bash
root@hello-world-flask-64dd645c57-4clbp:/app#
接下来,我们模拟业务高峰期场景,使用 ab 命令来创建并发请求:
root@hello-world-flask-64dd645c57-4clbp:/app# ab -c 50 -n 10000 http://127.0.0.1:5000/
在这条压力测试的命令中,-c 代表 50 个并发数,-n 代表一共请求 10000 次,整个过程大概会持续十几秒。
接下来,我们打开一个新的命令行窗口,使用下面的命令来持续监控 Pod 的状态:
$ kubectl get pods --watch
NAME                                 READY   STATUS    RESTARTS   AGE
hello-world-flask-64dd645c57-9x869   1/1     Running   0          4m6s
hello-world-flask-64dd645c57-vw8nc   0/1     Pending   0          0s
hello-world-flask-64dd645c57-46b6s   0/1     ContainerCreating   0          0s
hello-world-flask-64dd645c57-vw8nc   1/1     Running             0          18s
–watch 参数会一直等待,你可以使用 ctrl+c 或关闭窗口来终止。
这里参数 --watch 表示持续监听 Pod 状态变化。在 ab 压力测试的过程中,会不断创建新的 Pod 副本,这说明 K8s 已经感知到了 Pod 的业务压力,并且正在自动进行横向扩容。
总结
这节课,我先介绍了基于 VM 的扩容和自愈方案,可以看到,它们在扩容速度和流量管理上存在较大的不足之处。然后,我通过两个实际的例子向你直观地展示了 K8s 自愈和自动扩容的强大之处。
K8s 的自愈和扩容的对象都是 Pod,它是 K8s 的最小调度单位。在创建 Pod 的时候,我们并不是像上一节课那样直接创建 Pod 工作负载,而是通过创建 Deployment 工作负载来间接创建 Pod。通过这种方式,我们可以很方便地创建多个 Pod 副本,并且只需要关注 Deployment 的状态就可以间接地控制 Pod 的状态。
此外,我还为你介绍了一种编写 Manifest 的方法,也就是使用 kubectl create deployment --dry-run=client -o yaml 命令,它会为我们输出详细的 Manifest 信息。这条命令适用于非常多的 K8s 对象,具体有哪些对象你可以使用 kubectl create --help 查看。在未来的工作中,当你需要编写 Manifest 又不记得语法时,它会对你非常有帮助。
除了 Deployment 工作负载,在自动扩容的实验过程中,我们还引出了好几个新概念,我们现阶段只需要知道它们的功能即可,在接下来的课程中我还会为你详细介绍。
思考题
最后,给你留一道思考题吧。
能不能分享一下你现在使用的自愈和扩容方案是什么呢?相比较 K8s ,它有什么优势和缺点?
欢迎你给我留言交流讨论,你也可以把这节课分享给更多的朋友一起阅读。我们下节课见。
精选留言
2022-12-22 23:26:35
2. 创建 kind :kind create cluster --config config.yaml
3. 创建 deployment:kubectl create deployment hello-world-flask --image=lyzhang1999/hello-world-flask:latest --replicas=2
4. 生成 yaml文件:kubectl create deployment hello-world-flask --image lyzhang1999/hello-world-flask:latest --replicas=2 --dry-run=client -o yaml
5. 创建 service:kubectl create service clusterip hello-world-flask --tcp=5000:5000
6. 创建 ingress:kubectl create ingress hello-world-flask --rule="/=hello-world-flask:5000"
7. 创建 ingress-nginx:kubectl create -f https://ghproxy.com/https://raw.githubusercontent.com/lyzhang1999/resource/main/ingress-nginx/ingress-nginx.yaml
8. 访问测试:while true; do sleep 1; curl http://127.0.0.1; echo -e '\n'$(date);done
9. 模拟宕机:kubectl exec -it hello-world-flask-56fbff68c8-2xz7w -- bash -c "killall python3"
10. 创建 metric server:kubectl apply -f https://ghproxy.com/https://raw.githubusercontent.com/lyzhang1999/resource/main/metrics/metrics.yaml
11. 等待deployment创建成功:kubectl wait deployment -n kube-system metrics-server --for condition=Available=True --timeout=90s
12. 创建自动扩容策略: kubectl autoscale deployment hello-world-flask --cpu-percent=50 --min=2 --max=10
13. deployment 设置资源配额:kubectl patch deployment hello-world-flask --type='json' -p='[{"op": "add", "path": "/spec/template/spec/containers/0/resources", "value": {"requests": {"memory": "100Mi", "cpu": "100m"}}}]'
14. 查看最新创建的pod:kubectl get pod --field-selector=status.phase==Running
15. 创建并发请求:kubectl exec -it hello-world-flask-64dd645c57-4clbp -- ab -c 50 -n 10000 http://127.0.0.1:5000/
16. 查看 pod 数量:k get pods -w
2022-12-22 23:49:02
Horizontal Pod Autoscaler (HPA):根据 CPU 利用率增加或减少复制控制器、部署、副本集或有状态集中的 pod 数量——缩放是水平的;
Cluster Autoscaler: 根据 pod 的资源请求自动添加或删除集群中的节点;
Vertical Pod Autoscaler (VPA):它增加和减少容器 CPU 和内存资源配置,以使集群资源分配与实际使用情况保持一致。
2022-12-14 15:55:34
2023-04-08 00:27:35
2022-12-13 13:05:20
[root@iZwz90sfnybprmnd5ojhr9Z data]# while true; do sleep 1; curl http://127.0.0.1; echo -e '\n'$(date);done
Hello, my first docker images! hello-world-flask-c68dc87d7-tfvcs
Tue Dec 13 12:58:02 CST 2022
Hello, my first docker images! hello-world-flask-c68dc87d7-kbv4j
Tue Dec 13 12:58:03 CST 2022
Hello, my first docker images! hello-world-flask-c68dc87d7-tfvcs
Tue Dec 13 12:58:04 CST 2022
Hello, my first docker images! hello-world-flask-c68dc87d7-tfvcs
Tue Dec 13 12:58:05 CST 2022
Hello, my first docker images! hello-world-flask-c68dc87d7-kbv4j
Tue Dec 13 12:58:06 CST 2022
Hello, my first docker images! hello-world-flask-c68dc87d7-kbv4j
Tue Dec 13 12:58:07 CST 2022
Hello, my first docker images! hello-world-flask-c68dc87d7-tfvcs
Tue Dec 13 12:58:08 CST 2022
Hello, my first docker images! hello-world-flask-c68dc87d7-kbv4j
Tue Dec 13 12:58:09 CST 2022
2024-01-09 16:17:37
2022-12-15 01:02:08
2025-07-10 22:31:02
$ kubectl create -f https://ghproxy.com/https://raw.githubusercontent.com/lyzhang1999/resource/main/ingress-nginx/ingress-nginx.yaml
error: error validating "https://ghp.ci/https://raw.githubusercontent.com/lyzhang1999/resource/main/ingress-nginx/ingress-nginx.yaml": error validating data: invalid object to validate; if you choose to ignore these errors, turn validation off with --validate=false
2024-03-10 10:37:29
Unable to connect to the server: dial tcp 138.2.88.86:443: i/o timeout
课程初期使用的一些链接已经失效了,请老师及时更新下,后继的学员们按着步骤进行操作就卡壳了。
2023-06-23 17:41:21
2023-05-10 22:55:52
kubectl patch deployment hello-world-flask --type=json -p="[{'op': 'add', 'path': '/spec/template/spec/containers/0/resources', 'value': {'requests': {'memory': '100Mi', 'cpu': '100m'}}}]"
2023-03-22 11:04:43
2023-03-14 13:44:00
2023-03-10 19:46:20
2023-02-28 13:01:32
2023-02-01 00:17:10
0/1 nodes are available: 1 Insufficient cpu. preemption: 0/1 nodes are available: 1 No preemption victims found for incoming pod.
看着前面像是cpu不够,有其他人也遇到这个问题的么?
2023-01-14 04:54:25
2023-01-11 10:10:59
2022-12-18 19:29:01
2022-12-15 16:08:10
Name: hello-world-flask
Labels: <none>
Namespace: default
Address:
Default backend: default-http-backend:80 (<error: endpoints "default-http-backend" not found>)
Rules:
Host Path Backends
---- ---- --------
*
/ hello-world-flask:5000 (10.10.2.209:5000,10.10.2.210:5000)
Annotations: <none>
Events: <none>
这个看起来是正常的,但是执行
curl http://127.0.0.1
得到:
curl: (7) Failed to connect to 127.0.0.1 port 80 after 0 ms: Connection refused
这是什么原因呢?